May 2012
Building a Canadian cylindrical hopper in 1/29th scale.
What’s out there.
In the early years, particularly in N scale, there was nothing available off the shelf and modellers would bash together cars of nearly appropriate shape and size with little or no regard to counting rivets.
Click on photo for enlargement
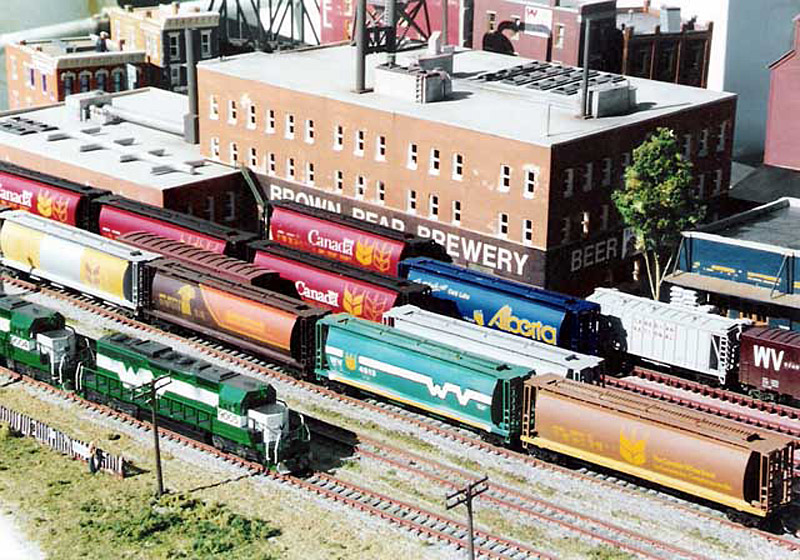
N scale hoppers on the Winter Valley shelf layout in Goose Bay Labrador.
As time went by wonderful, highly detailed models came on the market. First in HO of course and then, after a wait, in N scale and in O scale. By early 2001 I was buying my second dozen of these hoppers when I was hit in the face by model trains that had actual gravity.
It seemed as though I was back in 1972 again. Back to bashing just about everything I needed. Hmmmm. Back to actually having fun again.
The car
The cylindrical hopper is an icon of the Canadian West. It has become as prevalent in calendar photos as the CNoR 3rd Class station. In a little over 20 years there were over 30,000 of these cars plying the western grain roads but sadly there were none on the Winter Valley.
American and European 1/29th scale model makers had opted to build the typical ACF design. LGB and USA Trains put out those cars in various Wheat Board, Government of Canada, Saskatchewan and Alberta paint schemes and while I’m no perfectionist, I just couldn’t bring myself to buy and run what was just too obviously wrong.
The construction
It was my son who got me started in this. He bought an LGB ACF type three bay “Canada” hopper and because the frame and sides were separate parts, he quite easily converted it into a pretty darn good cylindrical car. He gave me the Saskatchewan Roughrider car for my birthday – and the real fun began.
Click on photo for enlargement
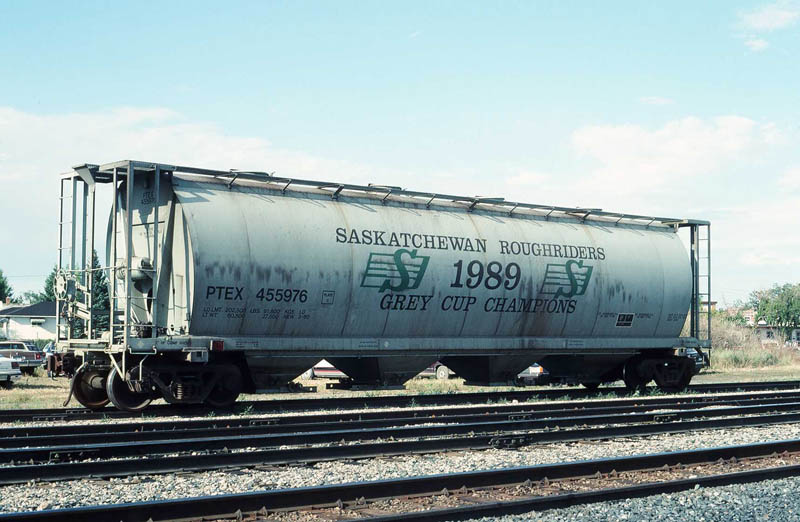
The Saskatchewan Roughrider cylindrical hopper as seen in the CP Rail yard next to Taylor Field in Regina.
The frame
The frame on the USA Trains car is far more difficult to deal with but I chose this model for the ‘bash’ because (a) it had four beautifully detailed and working hoppers and (b) it was, unlike the LGB model, the correct length give or take a couple of inches. Close enough for me anyway.
I removed the end frames as well as all the brake gear and put them aside. Both would have to be significantly modified. More on that later.
The problems developed when I began carefully cutting the ACF container off the frame because the USAT hoppers are correctly molded above the frame on the underside of the car. That meant I had to do some cutting on the inside. The easiest way to accomplish this was to cut off the sides about an inch above the frame and therefore above the tops of the hoppers. Then I used a Dremel tool to cut around the hoppers as well as remove the ACF style ends.
Click on photo for enlargement
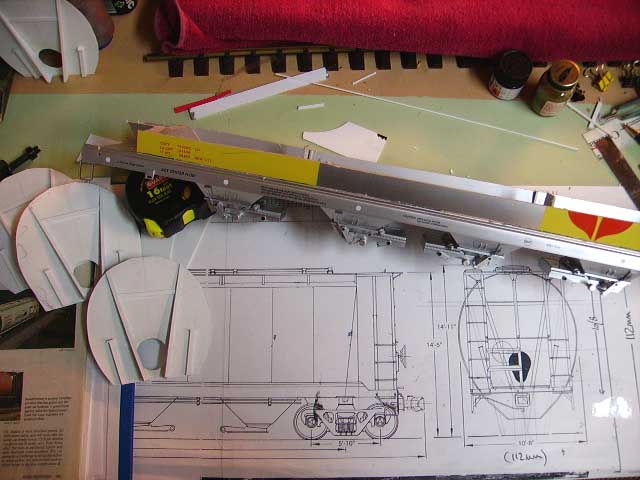
I had HO scale plans redone x3 at a local print shop so I was able to build with 1/29th scale details.
The couplers
The USAT truck mounted couplers are pretty good. They’re well designed and they will last forever. Still, some time ago I had decided to use body mounted Kadee couplers on all my engines and rolling stock. Two sizes are available but I use the larger of the two because I think I can get a little more reliability pulling 60 to 80 pounds of train by only sacrificing a fraction to scale. A theory not tested though. What’s more, the 930 type is a nice red/brown colour rather than black.Styrene shims had to be installed below the frame in order to lower the coupler center. My homemade Kadee height gauge came in handy once again.
The body
A completely new cylindrical body had to be built and installed on the old frame. My plans were taken from a February 1994 Model Railroader magazine. They had been originally printed in S scale (1/64th scale) so that needed to be addressed. A local print and copy shop used those to produce full 1/29th scale drawings at very little cost. This would also come in handy at decal time.
A word here. Some shops are very reluctant to copy anything in a magazine – for any use – due to copyright fears. Stories of folks loosing everything they owned through litigation are all over the Internet and local folklore. In this case the owner/operator was sure I was using the drawings, printed for hobbyists personal use, for my personal use.
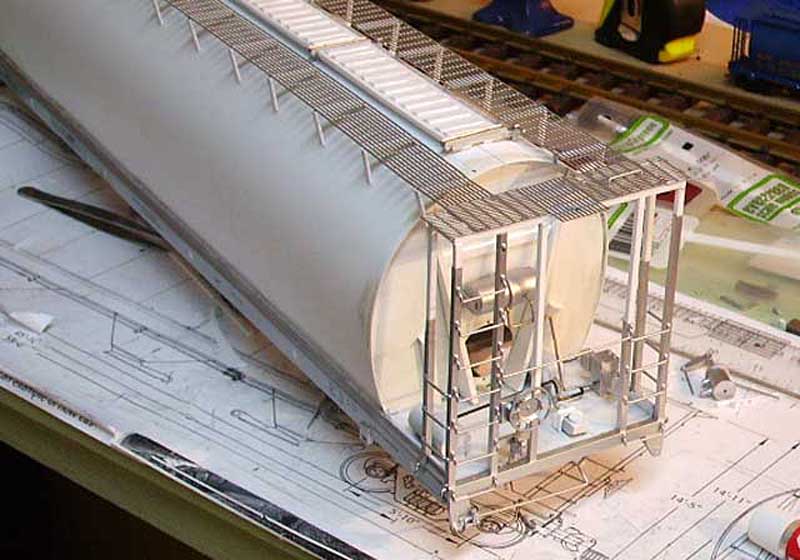
The material I used was a white .030 styrene sheet but you might choose something a little heavier. Four feet by eight-foot sheets of styrene are often available at sign shops for next to nothing. Interior Paint and Plastics supplied mine for $16.00 CDN. I had to roll it into a tight package just to get it home in the car. The correctly shaped ends (see photo) were laminated for extra strength and detailed with Evergreen stock from the hobby shop.
A solid support structure would still be required on the inside of the ‘tank’ to define the proper shape and give strength to the body. I wouldn’t be picking the car up by the body like I do with smaller scales but still…. These supports were made from ¼ inch plywood glued and siliconed onto the frame between each hopper.
Click on photo for enlargement
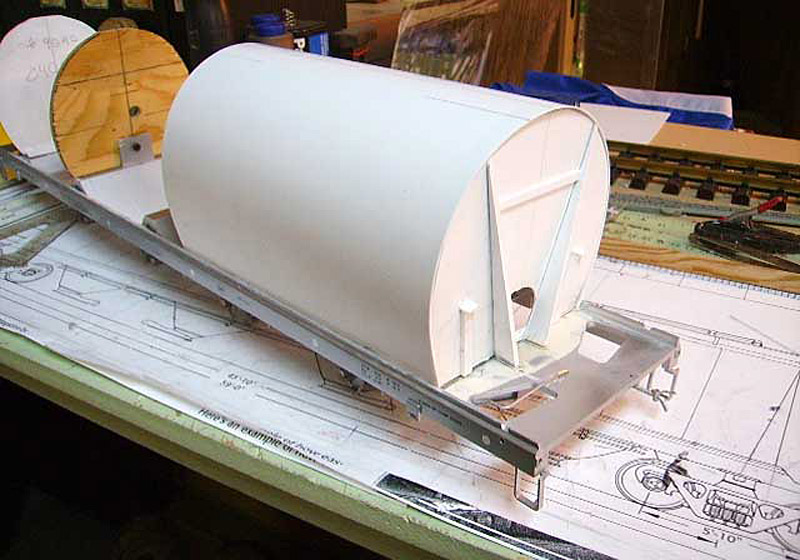
This sample photo shows how a full sized styrene sheet will be laid over the ends and the wooden structures.
I found the best way to ‘lock’ the shell over the frame was to Dremel out a groove along the inside of the frame between the frame and the hoppers. After much cutting and trimming I had a single sheet of styrene that would set down into the groove on one side, wrap tightly over the wooden supports and snuggle down into the groove on the other side. It would also fit tightly over the ends with little or no gaps. This was a devil of a task for multiple reasons. The most significant was that the car ends are not vertical but once I was satisfied with the fit I applied styrene cement along the edges, and ends and silicone over the wooden supports, before rolling it into place for the last time.
A little trick I was told about on line. If you want to simulate a weld line (and there were obvious weld lines on the prototype) you just have to cover the surface with masking tape leaving a very narrow space between the strips. About .5mm works for me. I applied a running bob of airplane glue to the small gap, let it just dry, and peal off the tape leaving a perfectly straight ‘weld’ on the surface. The car I was building had 8 weld lines on each side. Paint and decals were not going to cover them completely and that was a good thing.
The brakes
My own photos of the prototype B end, and the examination of a quality HO model I purchased just for this job, show the original ACF car is significantly different from the cars built in Canada no matter who did the building. The tank and lines had to be reworked and new tank added to the mix. The air brake valve, always painted turquoise I understand, had to be moved to the side.
.
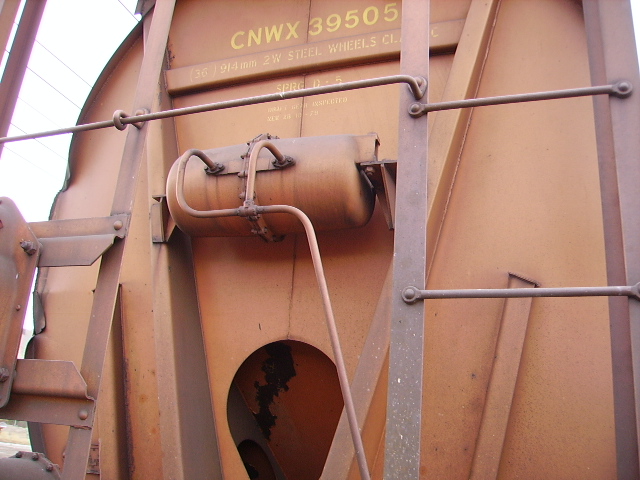
Click on photo for enlargement
This photo of the upper B end shows the upper half of the B end.
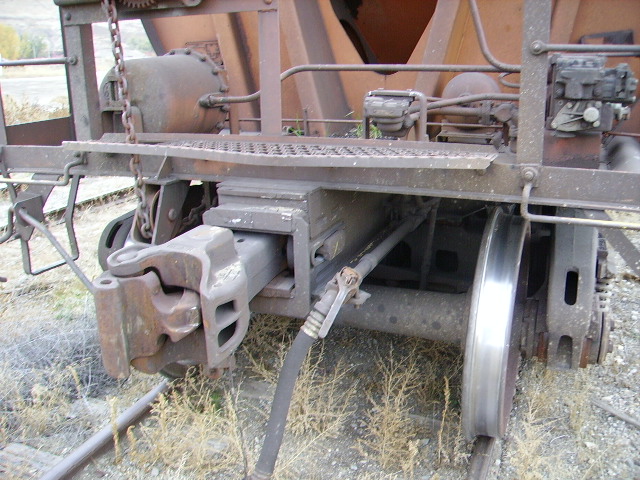
Click on photo for enlargement
This photo shows some of the detail on the frame of the B end of the car. It was interesting that the frame on the A end supported a healthy crop of grain not quite ready for harvest. This feature was not modeled.
The angle iron structure on the USA Trains model was ‘cut off’ at the top corners as they were in the ACF prototype. This was probably for clearance reasons not encountered on the open prairie. Whatever the reason, that had to be rebuilt into the familiar square shape using Evergreen material. I did not move the inside support for the brake wheel assembly over to the centerline of the car. This extra work would add nothing to the finished car. In fact, as I wasn’t working with steel or brass, it would have just been a weak spot I didn’t need.
Click on photo for enlargement
The unpainted B end shows the finished product. The nice metal roof walks from the USA Trains car were installed, after a little reworking, and were supported by a new ‘square’ structure at each end.
The roof walks
The roof walk on the ACF model was beautifully done and so I just couldn’t replace it with something else even if something else were available. The shape was wrong due to the original notched corner but I used the ‘over the coupler step plate’ that came with the model (same material) to fashion the correction at each ladder and then I used a similar material to replace the step.
The hatch covers were completely wrong on the ACF model so I had to scratch build new ones. These were often interchanged in prototype service so the colour and style became a delightful mix. I built both Landreth and Apex types for my hopper. Three silver and one salmon coloured.
The paint and decals
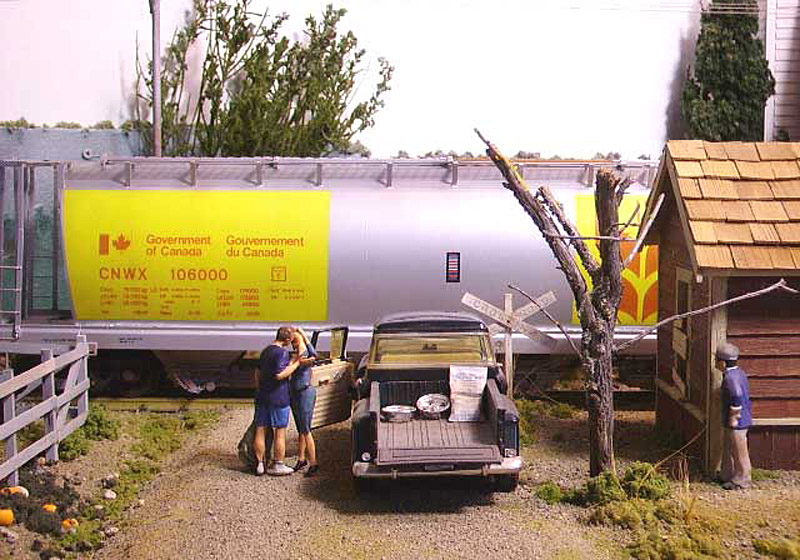
As I hinted at earlier, the decals were going to be a problem. Depending on what 1/29th scale decals were still available I could be finishing with a standard, salmon coloured Government of Canada hopper (fist issue) or the aluminum and yellow lightweight branch line model although I had built the aluminum variety.
All gone. No supplies left. The best I could do was a set of S scale dry transfer CDS products. Good enough for me. I’d used this product in the past (N scale and HO) and I still used it on all my rolling stock, but how to ‘scale up’ a dry transfer?
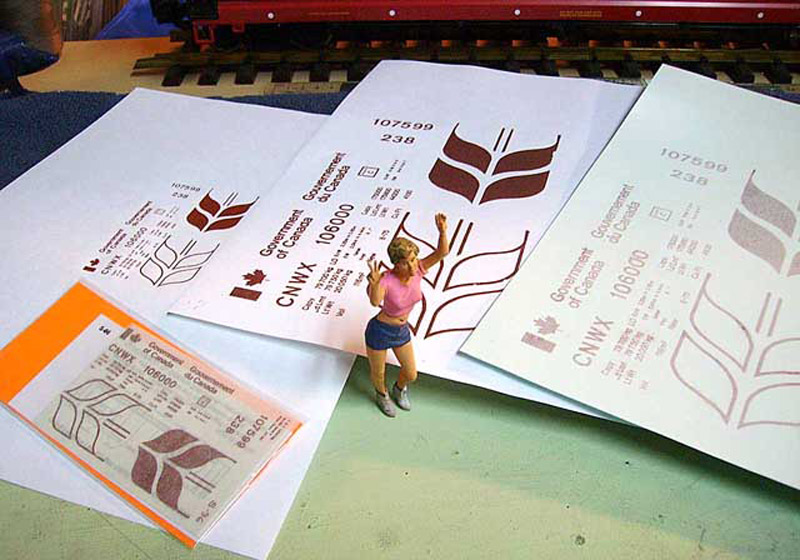
Click on photo for enlargement
The little lady helped me sort out my decals. S scale enlarged to 1/29th scale and then produced on my own printer.
The best I could do was apply the dry transfer to quality white paper and then have it blown up to 1/29th scale by the same people who did my drawings. Easy. Then I transferred this new larger pattern onto clear decal paper using my own copier. This resulted in an accurate G scale water slide decal. They were really hard to handle but two thin coats of Microscale liquid decal film and I got them fitted on the yellow panels.
Click on photo for enlargement
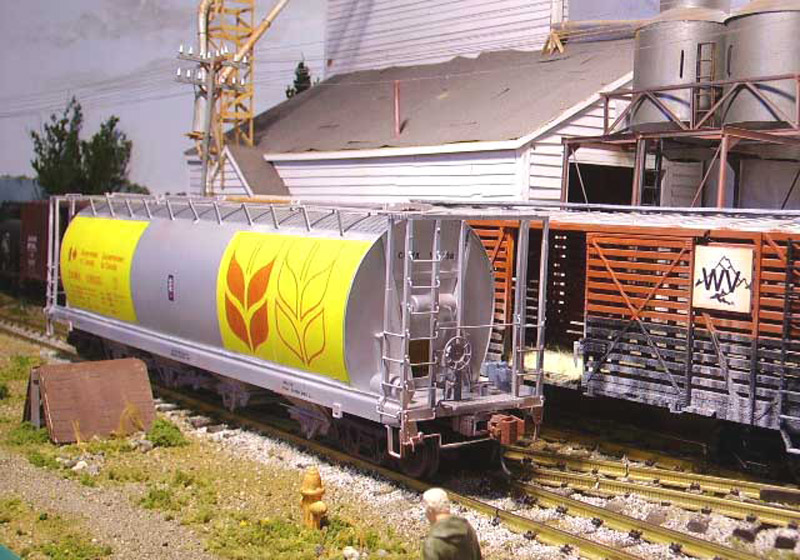
The new car was put on the layout with very little weathering except for the trucks and the hoppers. The couplers were already a nice brown colour.
Operation
Now the first of the new hoppers have arrived on the Winter Valley and they draw quite a bit of attention. Some mechanical and some political. But they’re going to be a real blessing around here come harvest and we no longer have to shuffle around half full boxcars with square wheels and bad brakes. And that big pile of grain doors can be sent of to the town dump.
Click on photo for enlargement
I’ve had a lot of requests about how this project came together. There are better models out there for sure and there are far simpler models too but I tried to keep it simple and make it “look just right”.
See you all at www.mylargescale.com